How To Start
For this, I am going to assume that you already know how to install flutter, dart and VS Code (or android studio) on your computer. If not, there are many good tutorials - many found on this very website. If you don’t have it, go get it, then you can come back here.
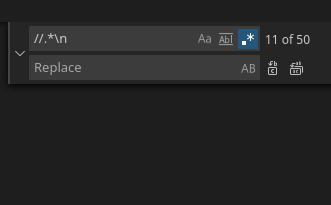
Following these instructions here, I first created the basic flutter application. I have named it create_patient, but you may call it whatever you’d like. First things first, I like to clear out all of the comments that I’m not going to use (this is obviously unnecessary). For this, I first go to the main.dart file, CTRL-F, make sure the regular expressions button is highlighted .*, then search for //.*\n. Don’t put anything in the replace field, and then click the replace all icon (the second one). Save it and all of the formatting will be taken care of.
I also do the same thing in the pubspec.yaml. However, for this you must search for ``#.*\n`. And also, you must be very careful about the formatting, because yaml reads spaces, if your indentations are off, it will cause problems.
Add Needed Packages
For this project, we will need the packages, fhir (of course) and also fhir_at_rest. We will be using get/getX, the url_launcher, and to ensure iOS support, cupertino_icons. Your pubspec.yaml file should look like the one on the left.
pubspec.yaml
name: create_patient
description: A flutter app that creates a (very) simple patient using the fhir package.

publish_to: 'none'
version: 1.0.0+1

environment:
  sdk: ">=2.12.1 <3.0.0"

dependencies:
  flutter:
    sdk: flutter
  fhir: ^0.4.6
  fhir_at_rest: ^0.4.2
  get: ^4.1.4
  url_launcher: ^6.0.3
  cupertino_icons: ^1.0.3

dev_dependencies:
  flutter_test:
    sdk: flutter

flutter:
  uses-material-design: true
Main.dart
For the main file, you are obviously welcome to change anything you’d like. To keep this as simple as possible, we are only going to change the title to "Create Patient". Also, we are going to be putting all of this code in the same file. Something you would never do in a real production app, but for our simple purposes, it should still be ok.
main.dart
import 'package:flutter/material.dart';
import 'package:get/get.dart';

void main() {
  runApp(MyApp());
}

class MyApp extends StatelessWidget {
  @override
  Widget build(BuildContext context) {
    return GetMaterialApp(
      title: 'Create Patient',
      theme: ThemeData(
        primarySwatch: Colors.blue,
        visualDensity: VisualDensity.adaptivePlatformDensity,
      ),
      home: CreatePatient(),
    );
  }
}
Create Patient
This will be the primary display portion of our application. To start, we are just going to have a scaffold, whose body is a Column Widget. The first (and for now only) child of that Column Widget will be a Row, and that Row will contain two RaisedButtons that don’t do anything. We can tell they don’t do anything because the onPressed returns null (the fat arrow replaces the return keyword). We name the buttons by having a Text Widget which is a child of the RaisedButton. As I said though, this is dull and functionless.
We are going to make our lives easier by first creating SmallActionButtons. These are going to be RaisedButtons with additional functionality and styling. You’ve probably be heard by now that everything in Flutter is a Widget. This is true for buttons as well. SmallActionButtons, RaisedButtons, the Scaffold, all of these are StatelessWidgets. So we can swap them out. We can change the RaisedButton in the code on the right to SmallActionButton. And instead of child: Text('Hapi: Search'), instead write: title: 'Hapi: Search'. This serves the same basic idea, which is to pass the the title to the Button class (and later we’re going to pass a function it should perform when it is pressed). It will of course give errors until we actually create that class.
class CreatePatient extends StatelessWidget {
  @override
  Widget build(BuildContext context) {
    return Scaffold(
      body: Column(
        mainAxisAlignment: MainAxisAlignment.spaceEvenly,
        children: [
          Row(
            mainAxisAlignment: MainAxisAlignment.spaceEvenly,
            children: <Widget>[
              RaisedButton(
                onPressed: () => null,
                child: Text('Hapi: Create'),
              ),
              RaisedButton(
                onPressed: () => null,
                child: Text('Hapi: Search'),
              ),
            ],
          )
        ],
      ),
    );
  }
}
SmallActionButton
If you pay attention, this actually looks like every other object oriented class you’ve ever seen. It’s going to have to two attributes, a constructor, and a single method called build which will return a Widget. For this particular class, we pass a title as a simple string, and then a Function, which it will perform when pressed. The rest of the class is just changes to make the button look nice. Changing the border, padding, etc. John is good at the pretty parts of flutter, so I mostly just steal what he’s done.
class SmallActionButton extends StatelessWidget {
  final String title;
  final void Function() onPressed;

  const SmallActionButton(
      {Key? key, required this.title, required this.onPressed})
      : super(key: key);

  @override
  Widget build(BuildContext context) {
    return ButtonTheme.fromButtonThemeData(
      data: Get.theme.buttonTheme.copyWith(minWidth: Get.width / 3),
      child: ElevatedButton(child: Text(title), onPressed: onPressed),
    );
  }
}
However, as we said, it’s still not particularly functional. Why? Because we haven’t passed it a function. So let’s do that. Instead of:
onPressed: () => null
let’s try
onPressed: () => _hapiCreate()
onPressed: () => _hapiSearch()
These will be the two functions we’ll create for the functionality of our app. The underscore at the beginning makes them private functions so they can only be called from inside of our main.dart file (which isn’t a problem for us, but it would be if you were making a large app). We could even place these functions inside of our CreatePatient class and then they would only be able to be called from inside the class.
If you’re curious, we’re using Get.theme… to use the GetX package to apply a theme to the buttons. But GetX is an extremely powerful and useful package that does all sorts of things from state management to dependency injection, and we’ll cover in a later tutorial.
HapiCreate
So finally we come to the FHIR® portion of our show. Note that this function is an async function and returns a Future. Future with nothing else is essentially like void but for an async function. What this means in practice is that when you’re writing a function that may take a while (querying something on the internet, reading from a database, opening a file, etc.) you may not want to wait for that to finish before moving onto the next thing. If you DO want to wait, you must prepend the function call with await. This signifies your app must finish the function before moving on. In our case, it’s not particularly important.
We do need to ensure we have all of the dependencies imported that we are going to need. So make sure the top of your main.dart file looks like this.
import 'package:fhir/r4.dart';
import 'package:fhir_at_rest/r4.dart';
import 'package:flutter/material.dart';
import 'package:get/get.dart';
import 'package:url_launcher/url_launcher.dart';
Next we can go ahead and create the function. We’re going to go ahead and create it with two positional arguments (the other type of argument is a named argument). For now, it’s not going to have any arguments, so you don’t need to pass it anything. The first thing that we do is create a new patient. We use the fhir package to make sure that it’s formatted correctly and has all of the required fields. Every resource has a resourceType in FHIR® that must be explicitly stated (at least for now). Then there’s the name. The way FHIR® is structured a name is a list of HumanNames. HumanNames have multiple fields, the two we’re going to use are given and family. given is a list of strings, family is a single string. That’s all we’re going to do with the fhir package.
Future _hapiCreate(String lastName, String firstName) async {
  var newPatient = Patient(
    resourceType: R4ResourceType.Patient,
    name: [
      HumanName(
        given: [firstName],
        family: lastName,
      ),
    ],
  );
  var newRequest = FhirRequest.create(
    base: Uri.parse('https://hapi.fhir.org/baseR4'),
    resource: newPatient,
  );
  var response = await newRequest
      .request(headers: {'Content-Type': 'application/fhir+json'});
  if (response?.resourceType == R4ResourceType.Patient) {
    Get.rawSnackbar(
        title: 'Success',
        message: 'Patient ${(response as Patient).name?[0].given?[0]}'
            ' ${response.name?[0].family} created');
  } else {
    Get.snackbar('Failure', '${response?.toJson()}',
        snackPosition: SnackPosition.BOTTOM);
    print(response?.toJson());
  }
}
The next step is to create the request. This is a little more complicated (for our purposes) because it requires multiple values. (P.S. You can create a request for dstu2, stu3, r4 or r5 versions of FHIR® but simply using that instead of the r4 you see in the code here). We are creating a new patient, so we’re going to be making a CreateRequest. There are lots of different types of interactions you can make with a FHIR® server, most are demonstrated here. To make the request, you must have the base url, and the resourceType that you’re going to be creating. You then call the request method (which is the same for all requests in this package), except that for this one you will also pass it the new patient you’ve created. If successful, you will receive back the patient that has been uploaded (along with a new id), if not, you will get an error message (and either way this will be displayed in a snackbar). The way this happens is using the Dartz package, which allows more functional programming, something I’m nowhere near an expert on and is way outside the scope of what we’re doing. We then fold (select the actions we want) if there’s an error (l) or if it’s a success (r). We print out the error in a snackbar (using Get - it makes life so much easier), or the patient’s name from the returned patient object (one more visible way to show it performed correctly). As long as it’s successful, you can now go and look at it.
HapiSearch
This will be much simpler because we’re just going to look at what we’ve created. We create a function with a launch method and feed in the url we’re interested in. Normally this Url would be created automatically through the fhir_at_rest package (so we don’t have to worry about syntax). However, since we want to view the resource directly, we’re just going to go look at it. The first version we have hardcoded in the named that we are going to look for. This request says to look at the Hapi server, for a patient, with the given name of ‘Patient’, the family name ‘Fhirfli’ and then asks it to return display it to us in a more visually appealing manner. The second version we’ve gone ahead and used the two strings that we passed to the function to allow it to search for any name that is requested. And that’s it! You’ve created two buttons, pushing one will create the patient, pushing the other will show it to you. Not bad right? Wait, you want to be able to enter the names yourself? Well you’re in luck, that will be our next step. However, that involves a little state management, so we’re going to save it for our next section header. No state management for our example!
 Future _hapiSearch(
  String lastName,
  String firstName,
) async {
  await launch('http://hapi.fhir.org/baseR4/'
      'Patient?'
      'given=Patient&'
      'family=Fhirfli&'
      '_pretty=true');
}
 Future _hapiSearch(
    String lastName,
    String firstName,
  ) async {
    await launch('http://hapi.fhir.org/baseR4/'
        'Patient?'
        'given=$firstName&'
        'family=$lastName&'
        '_pretty=true');
  }
Name Containers
Before we can input text, we need to create a widget to allow the user to do so. We do this with TextEditingControllers. And because as mentioned John likes for things to look nice, he has created a simple widget to enter names. It will be called _nameContainer. We are going to pass it to arguments, a TextEditingControllers along with a String that will be used as the hint for that particular text box. It’s going to look like you see on the right.
  Container _nameContainer(TextEditingController name, String text) =>
      Container(
        width: Get.width / 3,
        margin: EdgeInsets.symmetric(horizontal: 8),
        child: TextField(
          controller: name,
          decoration: InputDecoration(hintText: text),
        ),
      );
Creating New Names
For this we’re all setup, we just need to go back and add some things to the CreatePatient function. The first thing is that we’ll add are TextEditingControllers to our build. These are necessary almost anytime you want the user to be able to input text.
Then we are going to add a second row above the first in our Column. Column widgets can have multiple children. We’re are just going to make two rows. The first row is going to be the text boxes to enter the names. The second row is going to be the two buttons where we create the patient and then go and look at them.
In the first row, we are going to have two instances of _nameContainer. Notice all we do is pass in the corresponding TextEditingController and the hint text. So now we have the ability to enter text into a text box, we just need to add the ability to take that text and use it.
To do that, we go back to our second row, and look at the SmallActionButtons that we have already created. Remember above, we changed the onPressed action from null to _hapiCreate() or _hapiSearch(). But now that we’ve created those two functions, we know that they each take two strings as arguments. To get the values from the text box, we simply call the name of that controller and add .text. For us, as we see to the right, that’s _firstName.text and _lastName.text.
class CreatePatient extends StatelessWidget {
  @override
  Widget build(BuildContext context) {
    final _lastName = TextEditingController();
    final _firstName = TextEditingController();

    return Scaffold(
      body: Column(
        mainAxisAlignment: MainAxisAlignment.spaceEvenly,
        children: [
          //* Hapi FHIR calls
          Row(
            mainAxisAlignment: MainAxisAlignment.spaceEvenly,
            children: <Widget>[
              _nameContainer(_lastName, 'Last name'),
              _nameContainer(_firstName, 'First name'),
            ],
          ),
          Row(
            mainAxisAlignment: MainAxisAlignment.spaceEvenly,
            children: <Widget>[
              SmallActionButton(
                  title: 'Hapi: Create',
                  onPressed: () => _hapiCreate(
                        _firstName.text,
                        _lastName.text,
                      )),
              SmallActionButton(
                title: 'Hapi: Search',
                onPressed: () => _hapiSearch(
                  _firstName.text,
                  _lastName.text,
                ),
              ),
            ],
          )
        ],
      ),
    );
  }
And that brings us to an end. In this tutorial, we’ve walked through creating an app from the automatically created one in Flutter. We’ve added a way to enter a patient’s name, and then methods to create that patient in a public server, and then we can go and examine to see that indeed, we have done what we set out to do. On the backend we have used both the fhir package and the fhir_at_rest package because it makes our lives easier. We’re going to be covering more advanced topics in the future, but hopefully this will help you to start developing with FHIR® in Flutter.